![podaris_logo_png.png]](https://support.podaris.com/hs-fs/hubfs/podaris_logo_png.png?height=50&name=podaris_logo_png.png)
Wherever Podaris asks you to choose something to add, you get the asset library: one window for searching everything you have access to, previewing it on a map, and adding it to your project.
Where the asset library opens from
- The Layers panel: the Import button at the top of the panel.
- The Services panel: the import button.
- The References panel: Add reference.
- Project Settings: the Street Network field, and the Default Network field on Insight projects.
- Podaris:Insight: every network and dataset field in an analysis's options.
- The home screen: New, then Import.
The window title tells you what it is being used for, and the contents are limited to what makes sense there. Asking for a street network offers only Streets projects; importing services offers only sources that contain routes and stops.
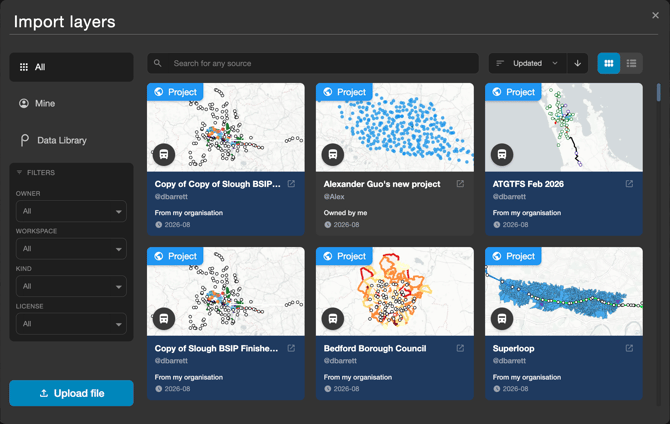
Finding a source
The tabs down the left narrow what you are looking at:
- All: everything you have access to.
- Mine: sources you own.
- Data Library: the Podaris-curated catalogue of census, boundary, and point of interest datasets.
- Managed Networks: the latest UK bus and rail data from BODS, TNDS, and RDG.
The Data Library and Managed Networks tabs only appear where that content can be used.
Search matches a source's title and description. You can also use the filters to find the source you want:
- Owner: who owns the source.
- Workspace: the workspace it belongs to.
- Kind: the type of source, such as Network, Dataset, or Streets.
- License: how the source may be reused.
Sort by Added, Updated, or Name, and use the arrow beside the dropdown to reverse the order. The toggle on the right switches between grid and list view; list view shows owner and date columns.
If you would like to upload your own file to use it as a source, learn how to do so here.
Reviewing a source before you add it
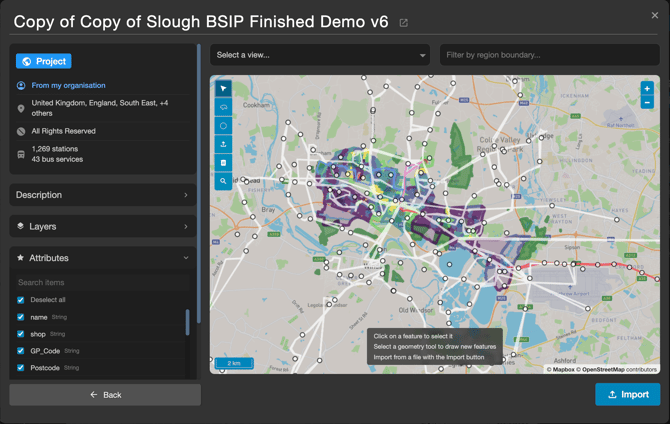
Click a card to open its detail view.
The sidebar shows what the source is and where it came from: its kind, whether it is Owned by me, From my organisation, or Managed by Podaris, plus region, license, data period, publisher, original data source, feature counts, and description, where each is available.
Below that, Layers and Attributes let you choose exactly what comes in. Untick a layer to leave it behind, and for datasets, untick attributes you do not need.
The map on the right previews the source's contents. Use the view selector above it to pick a particular view of the source rather than all of it. If a preview has not been generated yet (due to large project size), click Generate preview on the map.
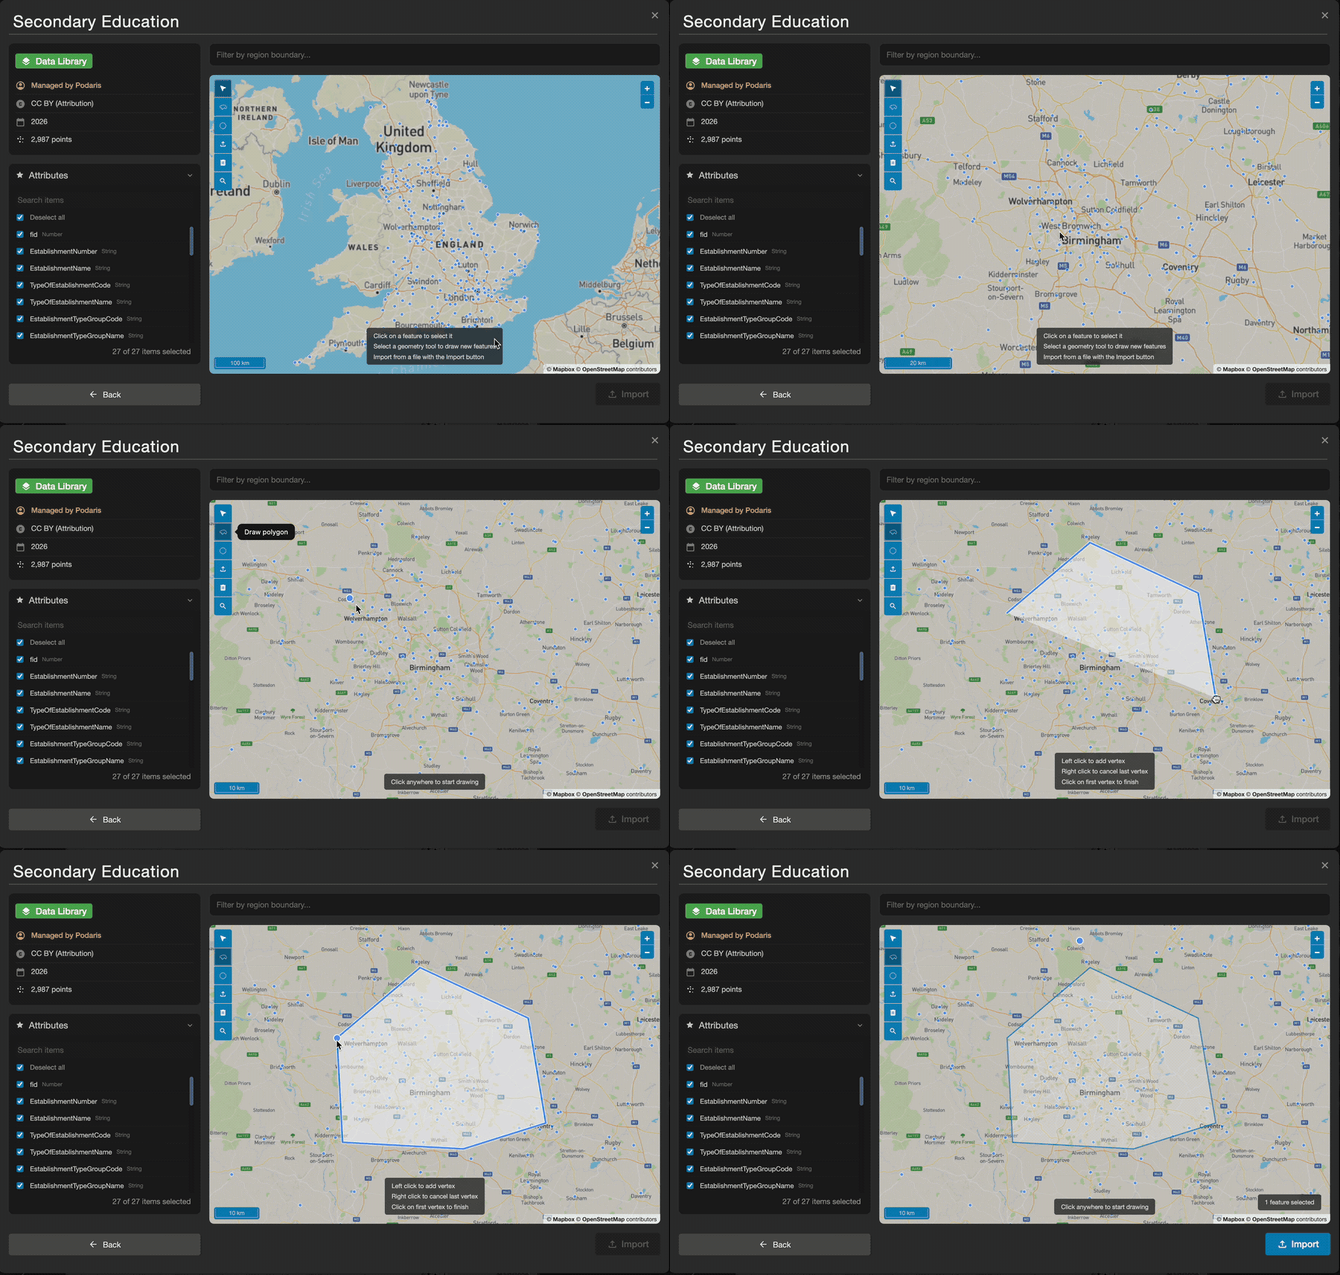
Limiting a source to an area
When a source can be filtered geographically, a toolbar appears on the map. Draw a polygon or circle around the area you want, or import a boundary from a GIS file. The search box above the map finds named administrative boundaries directly, so you can type a local authority name instead of drawing it.
Only features that intersect your boundary are brought in. A counter shows how many features you have selected, and the clear and zoom buttons reset or refocus the map.
Adding as a copy or a reference
A source can arrive in your project in one of two ways:
- A copy is an editable duplicate inside your project. It is yours to change, and it does not change when the original does.
- A reference is read-only and stays in sync with its source. Podaris still counts visible referenced content in calculations, isochrones, and queries.
Which one you get is decided by where you opened the library from:
| Opened from | What you get | Button |
|---|---|---|
| Layers panel, Services panel | A copy in your project | Import |
| References panel | A reference | Add as reference |
| Insight analysis fields, Project Settings | A reference | Select |
| Home screen, New or Import | A new project of your own | Create |
What happens next
Larger imports are queued and processed in the background. You can carry on working, and you will get a notification when the source is ready. Smaller selections and references appear straight away.
Things to keep in mind
- You only ever see sources you have permission to view, so if a colleague's project is missing, check its privacy settings.
- Editing a referenced source updates it everywhere it is referenced, with no need to re-attach it.
- Copying or referencing a specific view is useful when a network contains several scenarios and you only want one.
- A source cannot be copied into itself, and copying requires permission to clone the original.