![podaris_logo_png.png]](https://support.podaris.com/hs-fs/hubfs/podaris_logo_png.png?height=50&name=podaris_logo_png.png)
When to use a Tileset project
| Use case | Example |
| Scanned historical or planning maps |
An existing masterplan drawing you want to trace over
|
| Custom aerial imagery |
A survey image not available in the standard map provider
|
| Third-party map data |
An XYZ tile service or ArcGIS MapServer layer
|
| Proposed site layouts |
An architect's site plan georeferenced to real-world coordinates
|
If you want to display vector data features (points, lines, polygons with attributes) rather than a raster image, use a Dataset project instead.
Creating tilesets
You can also use tilesets hosted by third-party mapping services. When using your own images, Podaris provides a "georeferencing" capability to create tilesets that are correctly adjusted for location, scale, and map projection.
Creating a new tileset by georeferencing an image
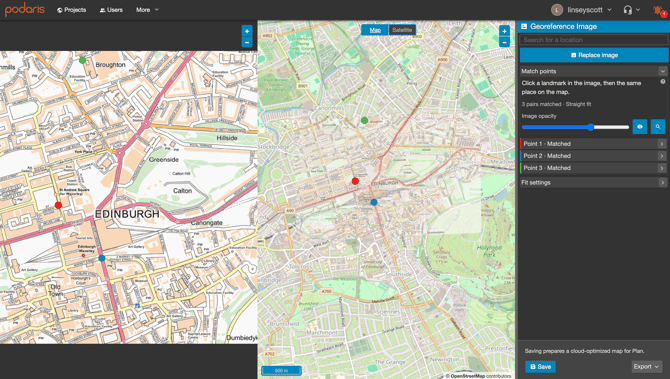
Tilesets shared by you and others can be used in multiple projects. In order to create a tileset from the home screen:
- Click + New and click Tileset.
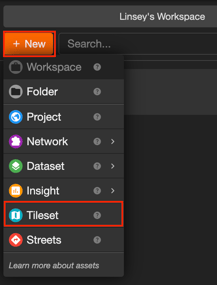
-
Select the privacy settings and location.
- Choose a name and write a description for your tileset. Click Save Changes.
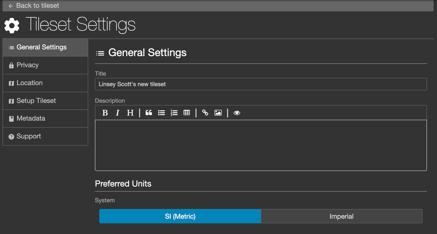
-
Navigate to the Setup Tileset tab. Select your Tileset Type as Image and click Open Georeferencer.
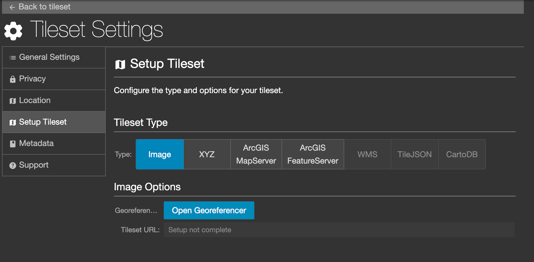
-
The georeferencer will open. Click Choose Image to upload an image from your computer.
-
You must place at least 3 reference points by first clicking on a distinct location on your image and then clicking the corresponding location on your map. Place these reference points as far from each other as possible, ideally in a triangular formation.
-
As you add these reference points, their respective pixel and map coordinates will be added in the Match Points panel (you can edit these values if you require more precision).
- The Georeferenced image will match to the map as you add these reference points.
-
Click Save once you are happy with your reference points. Your tileset will then been added to the library of tilesets usable within your projects.
Add a tileset layer within a project
-
From within your project, click Add Tileset Layer
 on the tilesets pane of the Layers Panel
-
Select the desired overlay opacity and your tileset's thumbnail from the Add Map Layer pane and click Okay to see it overlayed.
Importing a custom TileServer
It is possible to import third party TileServers for use as an overlay layer on your map. In this example, we will create a new tileset by referencing an XYZ tileserver.
-
From the home screen, click + New and click Tileset.
-
Select the privacy settings and location.
-
Choose a name and write a description for your tileset. Click Save Changes.
-
Navigate to the Setup Tileset tab. Select XYZ as the type.
-
Specify the tileserver URL, minimum and maximum zoom values.
-
Specify a privacy level and click OKAY to add your chosen tileset to your library.
 Note Currently, only TileServer URLs served over HTTPS are permitted within Podaris.
Upcoming import types
We currently support the following import types:
- XYZ
- ArcGIS MapServer
- ArcGIS FeatureServer
We are working to expand our selection of tileset import formats to include WMS, TileJSON and CartoDB. Stay up to date with feature updates by subscribing to our newsletter. or contact us at sales@podaris.com to discuss your requirements.
Reasonable use policy
If you have created a tileset within a free account, then Podaris reserves the right to suspend serving of the tileset at any time. Standard pro accounts are allowed up to 1,000 tileset loads per month. For higher-volume hosting requirements, please contact sales@podaris.com